6 jQuery 기본 [객체, 선택자]

|
views

jQuery는 자바스크립트의 주요 라이브러리이다. (HTML문서 조작 단순화)


[1] jQuery 로딩하기

  1. 파일 다운로드 후 가져오기 (src=”해당 파일 경로”)

    <script type="text/javascript" src="assets/js/jquery/jquery-3.1.1.js"></script>


  1. CDN

    <script src="https://code.jquery.com/jquery-3.1.1.js"></script>


[2] jQuery Element 선택 시점

<body>
	<h1 id="header">Element를 선택해야 하는 시점</h1>
</body>

위의 코드의 id="header" 선택하기.


1, Vanila JS - window.onload = function(){}

window.onload = function(){
    console.log(document.getElementById('header'));
}


2, jQuery 함수 사용 - jQuery(document).ready(function(){});

jQuery(document).ready(function(){
    console.log($('header'));
});


3, $ 함수 사용1 - $(document).ready(function(){});

$(document).ready(function(){
    console.log($('header'));
});


4, $ 함수 사용2 - $(function(){}); => 가장 많이 사용

$(function(){
    console.log($('header'));
});

[3] jQuery Object 알아보기

<script>
    var $obj = {
        "0" : document.getElementById('header'),
        length : 1
    } // $h1 과 동일

	$(function(){
		var $h1 = $('#header');
		console.log($h1.length); // 1
		console.log(typeof($h1) + " : "+ ($h1 instanceof Array)); // object : false
		console.log($h1[0]); // <h1 id="header">jQuery Object</h1>
		console.log($h1[0] + " : " + typeof($h1[0])); // [object HTMLHeadingElement] : object
		console.log($h1.get(0)+ " : "+ typeof($h1.get(0))); // [object HTMLHeadingElement] : object

		$h1.click(function(){
			this
		});
	});
</script>
<body>
	<h1 id="header">jQuery Object</h1>
</body>

[4] jQuery 선택자 연습

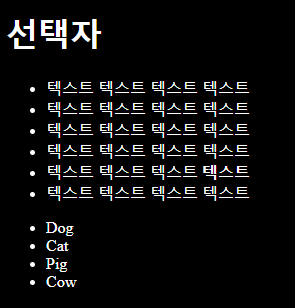
<body>
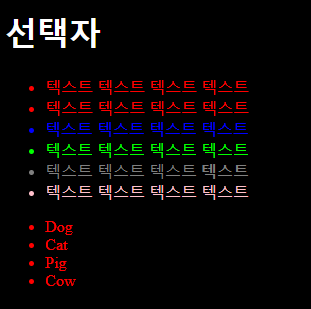
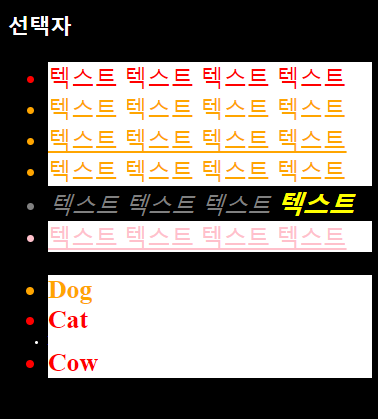
    <h1>선택자</h1>
    <ul>
        <li>텍스트 텍스트 텍스트 텍스트 </li>
        <li id="">텍스트 텍스트 텍스트 텍스트 </li>
        <li id="third">텍스트 텍스트 텍스트 텍스트 </li>
        <li id="fourth">텍스트 텍스트 텍스트 텍스트 </li>
        <li class="gray">텍스트 텍스트 텍스트 <strong>텍스트</strong> </li>
        <li class="pink">텍스트 텍스트 텍스트 텍스트 </li>
    </ul>

    <div>
        <ul>
            <li id="first"> Dog </li>
            <li> Cat </li>
            <li> Pig </li>
            <li> Cow </li>
        </ul>
    </div>
</body>


1, body 전체 선택

$(function(){
    setTimeout(function(){
        $('body').css('background-color', 'black').css('color', 'white');
    }, 2000);
});
views


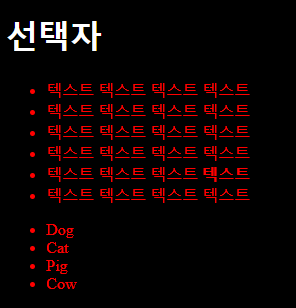
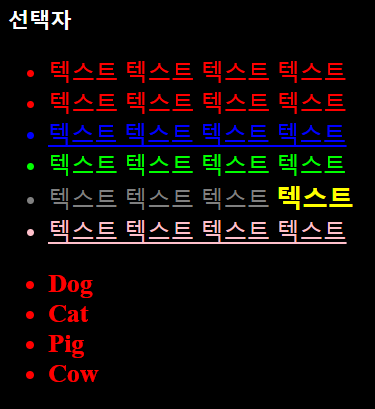
2, 태그 선택자

var $li = $('li');
$li.css('color', '#f00');
views


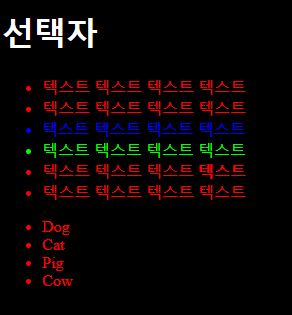
3, ID 선택자 (hashing이 되어있어 가장 빠른 탐색)

id 선택자 : #id

$('#third').css('color', '#00f');
$('#fourth').css('color', '#0f0');
views


4, class 선택자

class 선택자 : .class

$('.gray').css('color', 'gray');
$('.pink').css('color', 'pink');
views


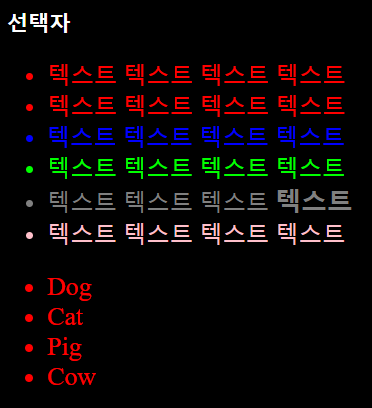
5, 전체 선택자

// 전체 선택
$('*').css('font-size', '1.1em');
views


—- 1, 2, 3, 4의 조합—-

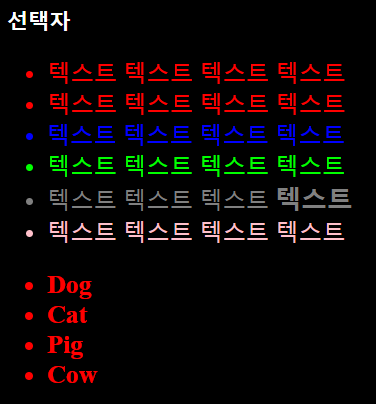
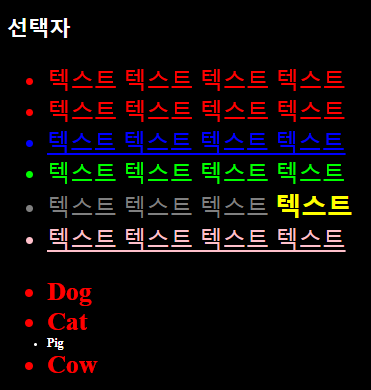
6, 자식 선택자

// div 밑의 ul 밑의 li 글자 두껍게 적용
$('div > ul > li').css('font-weight', 'bold');
views


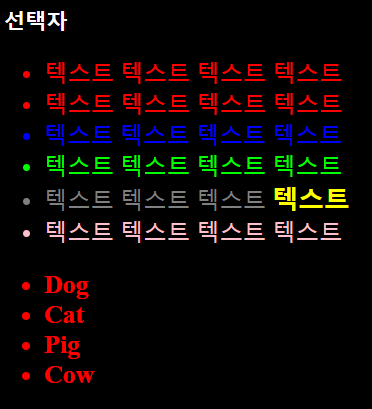
7, 하위(자손) 선택자

// ul밑의 strong 태그
$('ul strong').css('color', 'yellow');
views


8, 그룹 선택자

// id=third와 class=pink 선택
$('#third, .pink').css('text-decoration', 'underline');
views


9, 인접 선택자

// id=first의 다음 li의 다음 li
$('#first  + li + li').css('color', 'white').css('font-size', '0.5em');
views


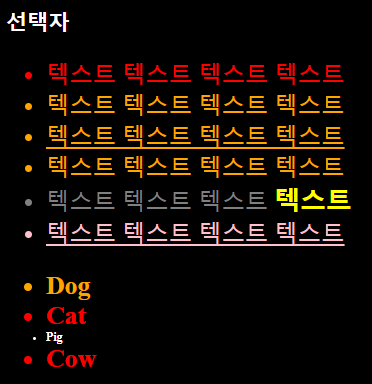
10, 속성

// li중 id가 있는 녀석
$('li[id]').css('color', 'orange');
views
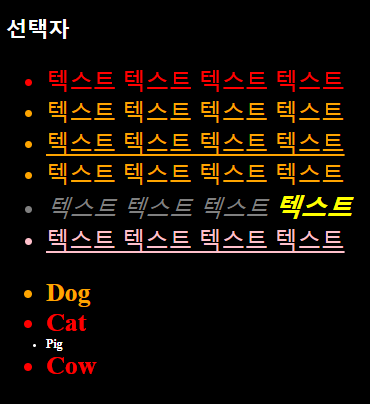
// li중 class가 gray인 녀석
$('li[class=gray]').css('font-style', 'italic');
views
// li중 class가 gray가 아닌 녀석(id 없는 애도 적용 됨)
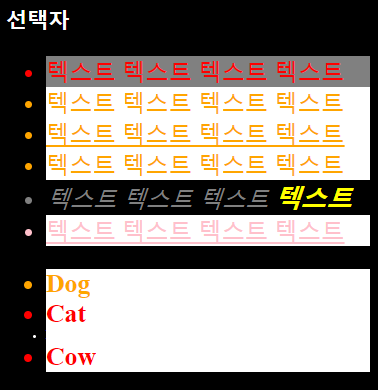
$('li[class!=gray]').css('background-color', 'white')
views


11, filter

// 전체 li중 첫번 쨰 녀석만
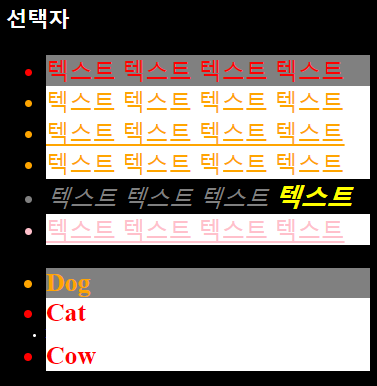
$('li:first').css('background-color', 'gray');
views
// ul의 모든 li의 첫번째 자식들
$('ul li:first-child').css('background-color', 'gray');
views
각 종 filter 사용하기
$('li:last') 		// 마지막
$('li:odd') 		// 홀수
$('li:even') 		// 짝수
$('li:contains("Cat")') // text
$('li:has("strong")')	// tag


전체코드

<!DOCTYPE html>
<html>
<head>
<meta charset="UTF-8">
<title>Insert title here</title>
<!-- CDN을 사용하는 방 -->
<!-- script src="https://code.jquery.com/jquery-3.1.1.js"></script-->
<!-- 내려받아 사용하기 -->
<script type="text/javascript" src="assets/js/jquery/jquery-3.1.1.js"></script>
<script>
	$(function(){
		setTimeout(function(){
			$('body').css('background-color', 'black');
			$('h1').css('color', 'white');

			// 1. 태그 선택자
			var $li = $('li');
			$li.css('color', '#f00');

			// 2. ID 선택자 (hashing이 되어있어 가장 빠른 탐색)
			$('#third').css('color', '#00f');
			$('#fourth').css('color', '#0f0');

			// 3. class 선택자
			$('.gray').css('color', 'gray');
			$('.pink').css('color', 'pink');

			// 4. 전체 선택자
			$('*').css('font-size', '1.1em');

			// --- 1, 2, 3, 4 조합 ---
			// 5. 자식
			$('div > ul > li').css('font-weight', 'bold');

			// 6. 하위(자손)
			$('ul strong').css('color', 'yellow');

			// 7. 그룹
			$('#third, .pink').css('text-decoration', 'underline');

			// 8. 인접
			$('#first  + li + li').css('color', 'white').css('font-size', '0.5em');

			// 9. 속성
			// li중 id가 있는 녀석
			$('li[id]').css('color', 'orange');

			// li중 class가 gray인 녀석
			$('li[class=gray]').css('font-style', 'italic');

			// li중 class가 gray가 아닌 녀석(id 없는 애도 적용 됨)
			// $('li[class!=gray]').css('background-color', 'white')


			// 10. filter
			// 전체 li중 첫번 쨰 녀석만
			$('li:first').css('background-color', 'gray');
			$('ul li:first-child').css('background-color', 'gray');
			$('li:last')
			$('li:odd')
			$('li:even')
			$('li:contains("Cat")') // text
			$('li:has("strong")')	// tag

			/*$('div li:first').css('background-color', 'gray');
			$('div:first').css('background-color', 'gray');*/


		}, 2000);
	});
</script>
</head>
<body>
	<h1>선택자</h1>
	<ul>
		<li>텍스트 텍스트 텍스트 텍스트 </li>
		<li id="">텍스트 텍스트 텍스트 텍스트 </li>
		<li id="third">텍스트 텍스트 텍스트 텍스트 </li>
		<li id="fourth">텍스트 텍스트 텍스트 텍스트 </li>
		<li class="gray">텍스트 텍스트 텍스트 <strong>텍스트</strong> </li>
		<li class="pink">텍스트 텍스트 텍스트 텍스트 </li>
	</ul>

	<div>
		<ul>
			<li id="first"> Dog </li>
			<li> Cat </li>
			<li> Pig </li>
			<li> Cow </li>
		</ul>
	</div>
</body>
</html>

[5] jQuery를 이용해 selected 옵션 주기
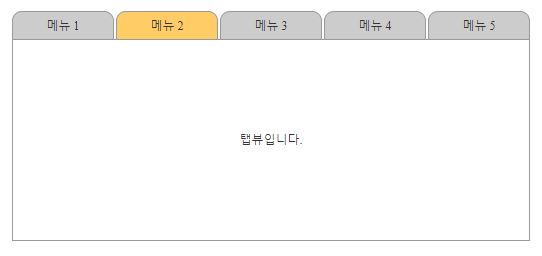
views

코드

<!DOCTYPE HTML>
<html>
<head>
	<meta charset="utf-8">
	<title>리스트를 이용한 메뉴 만들기</title>
	<style type="text/css">
		*		{ margin:0; padding:0 }
		body	{ font-family: '맑은 고딕' 돋움; font-size:0.75em; color:#333 }
		ol, ul	{ list-style-type: none }
		.tab-box {
			width: 520px;
			margin: 20px auto;
		}
		.tab-box ul {
			height: 29px;
		}
		.tab-box ul li {
			float: right;
			width:100px;
			height:22px;
			border:1px solid #999;
			background-color:#ccc;
			text-align: center;
			padding-top: 5px;
			margin-right: 2px;
			border-top-left-radius:10px;
			border-top-right-radius: 10px;
			cursor: pointer;
		}
		.tab-box ul li.selected {
			background-color:#fc6;
		}
		.tab-box div {
			width: 516px;
			margin-top: -1px;
			border: 1px solid #999;
			text-align: center;
			height: 200px;
			line-height: 200px;
		}
	</style>
	<script type="text/javascript" src="assets/js/jquery/jquery-3.1.1.js"></script>
	<script>
		var tabBox = {
			init: function(){
				$('.tab-box li').click(function(){
					$('li.selected').removeClass('selected');
					$(this).addClass('selected');
				});
			}
		}
		$(function(){
			tabBox.init();
		});
	</script>
</head>
<body>
<div class="tab-box">
	<ul>
		<li>메뉴 5</li>
		<li>메뉴 4</li>
		<li>메뉴 3</li>
		<li>메뉴 2</li>
		<li>메뉴 1</li>
	</ul>
	<div>
		탭뷰입니다.
	</div>
</div>
</body>
</html>


5 Javascript(Vanilla JS) Event와 Bubbling

|
views

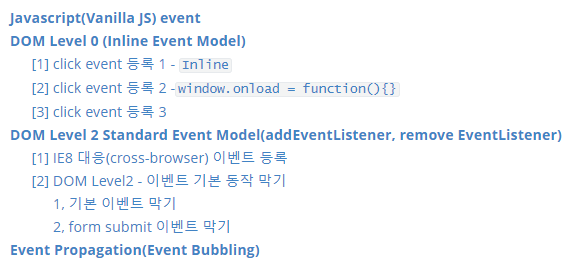
Javascript(Vanilla JS) event

시작하기 전 정리

[ JavaScript 이벤트 종류 ]
1. 마우스
2. 키보드 입력
3. HTML Frame
4. form & Input
5. touch

[ 용어 정리 ]
1. load : Event Name(Event Type)
2. onload, onclick : Event Attribute
3. function(){...} : Event Listener(Event Handler)


Event Model (Event Name에 Event Listener를 연결하는 방법)
1. DOM Level 0
    - Inline Event Model (태그 안에 `onclick='자바스크립트'` 넣는 것)
    - Basic Event Model (고전적인 이벤트, 기본 이벤트 처리) - `window.onload = function(){}`
        > 이건 이벤트를 하나밖에 못다는게 문제점!

2. DOM Level 2
    - Microsoft InternetExplorer Event Model -> attachEvent, detachEvent
    - Standard Event Model -> addEventListener, removeEventListener


DOM Level 0 (Inline Event Model)

[1] click event 등록 1 - Inline

inline에 click1와 같이 직접 주거나, click2와 같이 함수로 호출할 수 있다.

<script>
    /* DOM Level 0 Inline Event Model */
    var onClick = function(){
        console.log("clicked2");
    }
</script>
<body>
    <h1 onclick="console.log('clicked1')"> click1 </h1>
    <h1 onclick="onClick();"> click2 </h1>
</body>


[2] click event 등록 2 -window.onload = function(){}

<script>
    /*
    DOM Level 0 Inline Event Model
    (고전적인 이벤트, 기본 이벤트 처리) - `window.onload = function(){}`
    */

    window.onload = function () {
        var button1 = document.getElementById('button-1');

        button1.onclick = function(event){
            var counter = document.getElementById('counter-1');
            var count = Number(counter.innerText);
            counter.innerText =  "" + (count + 1);
        }
    }
</script>
<body>
    <button id="button-1"> button1</button>
    <h1>counter1: <span id="counter-1">0</span></h1>
</body>


[3] click event 등록 3

  • DOM Level 0 은 이벤트 핸들러를 하나만 연결할 수 있다. (단점)

buttion1과 buttion2에 같은 이벤트를 줄 때도 똑같은 코드를 2번 써야한다.

var button1 = document.getElementById('button-1');
var button2 = document.getElementById('button-2');

button1.onclick = function(event) {
    var counter = document.getElementById('counter-1');
    var count = Number(counter.innerText);
    counter.innerText =  "" + (count + 1);
}

button2.onclick = function(event) {
    var counter = document.getElementById('counter-2');
    var count = Number(counter.innerText);
    counter.innerText =  "" + (count + 1);
}

위의 코드 c-style로 고쳐보기

<script>
    window.onload = function () {
        var button1 = document.getElementById('button-1');
        var button2 = document.getElementById('button-2');

        button1.onclick =  button2.onclick = function(event) {
            // this == event.target (이벤트가 일어난 HTMLElement 객체)
            var counter = document.getElementById(this.getAttribute('data-counterid'));
            var count = Number(counter.innerText);
            counter.innerText =  "" + (count + 1);
        }
    }
</script>
<body>
    <button id="button-1" data-counterid="counter-1"> button1</button>
    <button id="button-2" data-counterid="counter-2"> button2</button>
    <h1>counter1: <span id="counter-1">0</span></h1>
    <h1>counter2: <span id="counter-2">0</span></h1>
</body>


DOM Level 2 Standard Event Model(addEventListener, remove EventListener)

[1] IE8 대응(cross-browser) 이벤트 등록

Internet Explorer 8 - 오래된 브라우저 버전 지원

<script>
    var registerEventHandler = function(element, eventName, handler){
        element && // element가 null이 아니라면
        element.attachEvent &&
        element.attachEvent('on'+eventName, handler);

        element && // element가 null이 아니라면
        element.addEventListener &&
        element.addEventListener(eventName, handler);
    }
    
    /*
    DOM Level 2 Standard Event Model :
    (addEventListener, remove EventListener)
    */
    window.onload = function () {
        var header = document.getElementById('header');

        // Multi Event Listener 연결 가능
        // Observer Pattern
        header.addEventListener('click', function(){
            console.log('click 1');
        });

        header.addEventListener('click', function(){
            console.log('click 2');
        });

        header.addEventListener('click', function(){
            console.log('click 3');
        });

        // < IE8 대응(cross-browser)
        registerEventHandler(header, 'click', function(){
            console.log('click 4')
        })

    }

</script>
<body>
    <h1 id="header">Click</h1>
</body>


[2] DOM Level2 - 이벤트 기본 동작 막기

막는 이유 : validation을 위해

1, 기본 이벤트 막기

만약 ajax data 통신을 할 때, 아래의 코드와 같이 작성하면 계속 페이지가 reload된다.

data가 들어와도 페이지가 새로고침이 되어 남아있지 않는다.

<a>태그는 기본적으로 click event가 있기 때문이다.

<script>
    window.onload = function () {
        var button = document.getElementById('fetch-data');
        button.addEventListener('click', function(){
            console.log('start fetching....');
        });
    }
</script>
<body>
    <a href="" id="fetch-data">Click</a>
</body>

이 이벤트를 막기 위해 event.preventDefault();코드를 넣어주면 새로고침 되지 않는다.

<script>
    window.onload = function () {
        var button = document.getElementById('fetch-data');
        button.addEventListener('click', function(event){
            event.preventDefault();
            console.log('start fetching....');
        });
    }
</script>
<body>
    <a href="" id="fetch-data">Click</a>
</body>


2, form submit 이벤트 막기

1) Level 0

<script>
    window.onload = function () {
        var form = document.getElementById('form-login');
        
        // DOM Level0 - 이벤트 기본 동작 막기
        form.onsubmit = function(){
            var email = document.getElementById('email').value;

            if(email == ''){
                alert('이메일 값은 필수 입력 항목입니다.');
                document.getElementById('email').focus();
                return false;
            }

            var password = document.getElementById('password').value;
            if(password == ''){
                alert('이메일 값은 필수 입력 항목입니다.');
                document.getElementById('password').focus();
                return false;
            }

            return true;
        }
    }
</script>
<body> 
    <form id="form-login" method="post" action="login">
        <label>이메일</label><br>
        <input type="text" name="email" id="emial">
        <br><br>
        <label>비밀번호</label><br>
        <input type="text" name="password" id="password">
        <br><br>
        <input type="submit" value="로그인">
    </form>
</body>


**2) Level 2 **

<script>
    window.onload = function () {
        // DOM Level2 - 이벤트 기본 동작 막기
        form.addEventListener('submit',function(event){

            event.preventDefault();

            var email = document.getElementById('email').value;

            console.log(email);
            if(email == ''){
                alert('이메일은 필수 입력 항목입니다.');
                document.getElementById('email').focus();
                return;
            }

            var password = document.getElementById('password').value;

            console.log(password);
            if(password == ''){
                alert('password는 필수 입력 항목입니다.');
                document.getElementById('password').focus();
                return false;
            }
            return;

            this.submit();
        });
    }
</script>
<body>
    <form id="form-login" method="post" action="login">
        <label>이메일</label><br>
        <input type="text" name="email" id="emial">
        <br><br>
        <label>비밀번호</label><br>
        <input type="text" name="password" id="password">
        <br><br>
        <input type="submit" value="로그인">
    </form>
</body>


Event Propagation(Event Bubbling)

이벤트 버블링이란?

특정 요소에서 이벤트가 발생했을 때, 해당 이벤트가 상위의 요소들로 전달되어 가는 특성을 말한다.

ex)

<body>
 <div id="outer-div">
     <div id="inner-div">
         <h2 id="header">
             <span id="text">text</span>
         </h2>
     </div>
 </div>
</body>
views

Event Bubbling 막기

<script>
    window.onload = function () {
        //event bubbling
        // ie : outer-div > inner-div > header > text
        // others : outer-div < inner-div < header < text

        document.getElementById('outer-div').addEventListener('click', function () {
            console.log('outer-div!')
        });

        document.getElementById('inner-div').addEventListener('click', function (e) {
            // cross browser
            // e == null -> IE8인 경우(window.event)

            var event = e || window.event;

            // 이벤트 전달 막기
            event.cancelBubble = true; // IE8
            event.stopPropagation && event.stopPropagation(); // others

            console.log('inner-div')
        });

        document.getElementById('header').addEventListener('click', function () {
            console.log('header')
        });

        document.getElementById('text').addEventListener('click', function () {
            console.log('text')
        });
    }

</script>
<body>
<h1>Event Propagation(Bubbling)</h1>
<div id="outer-div">
    <div id="inner-div">
        <h2 id="header">
            <span id="text">text</span>
        </h2>
    </div>
</div>
</body>

4 Javascript 객체 이해 / DOM, BOM 내용 정리

|
views

자바스크립트 객체는 3개로 분류할 수 있다.

  1. Native opject (Built-in object, core object)

    • 애플리케이션의 환경과 관계없이 언제나 사용할 수 있는 애플리케이션 전역의 공통 기능을 제공한다.
    • Object, String, Number, Function, Array, RegExp, Date, Math와 같은 객체 생성에 관계가 있는 함수 객체와 메소드로 구성된다.
  2. 호스트 객체

    • 브라우저 환경에서 객체를 말한다.
    • window, XmlHttpRequest, HTMLElement 등의 DOM 노드 객체와 같이 호스트 환경에 정의된 객체
  3. 사용자 정의 객체


🧐 Javascript Date 객체

// 현재시간
var now = new Date();
console.log(now, typeof now);

// 2019년 7월 5일
// month = current month -1
var d = new Date(2019, 6, 5);
console.log(d);

// 2019년 7월 5일 12:30:40
var d = new Date(2019, 6, 5, 12, 30, 40);
console.log(d);

// 객체 메서드
console.log(
    // " 년:" + (d.getYear() + 1900) + "\n" +
    " 년:" + (d.getFullYear()) + "\n" +
    " 월:" + (d.getMonth() + 1) + "\n" +
    " 일:" + d.getDate() + "\n" +
    " 요일:" + ['', '', '', '', '', '', ''][d.getDay()] + "\n"+
    " 시:" + d.getHours() + "\n" +
    " 분:" + d.getMinutes() + "\n" +
    " 초:" + d.getSeconds() + "\n" +
    " 밀리초:" + d.getMilliseconds()
)

d.setYear(2020);
console.log(d.getFullYear());
d.setMonth(11); // 12월 
console.log(d.getMonth()+1);

Fri Jul 05 2019 09:41:26 GMT+0900 (Korean Standard Time) “object”

Fri Jul 05 2019 00:00:00 GMT+0900 (Korean Standard Time)

Fri Jul 05 2019 12:30:40 GMT+0900 (Korean Standard Time)

년:2019

월:7

일:5

요일:금

시:12

분:30

초:40

밀리초:0

2020

12


🧐 Javascript function 객체

- JavaScript 함수 생성하는 방법

// 함수 객체 생성하는 방법1 - 잘 사용하지 않음
function f1(a, b){
    return a+b;
}
console.log(f1(10, 20));

// 함수 객체 생성하는 방법2 - 잘 사용하지 않음
var f2 = Function("a", "b", "var sum = a+b; return sum;");
console.log(f2(10, 20));


- JavaScript Anonymous Function - 익명함수

	// Anonymous Function - 익명함수
	// 함수 객체 생성하는 방법3
	var f3 = function(a, b){
		return a+b;
	}
	console.log(f3(10, 20));

	// 변수에 바로 할당하고 변수를 호출하면 함수가 실행
	var sum = (function(a,b){
		var s = a + b; // 여기서만 사용하고 사라지는 함수
		return s;
	})(10, 20); // 즉시실행함수
	console.log(sum);


- JavaScript 가변함수 파라미터 받기

  • (a=10, b=20)형식과 같이 기본적으로 명시된 함수 인자 말고, 정해지지 않는 개수만큼 변수 받기
  • 기본으로 받는 함수 인자 : this, arguments
var sum = function(){
    console.log(arguments)
}
sum(10);
sum(10, 20);
sum(10, 20, 30, 40, 50);
sum(10, 20, 30, 40, 50, 60, 70, 80);

Arguments [10, callee: ƒ, Symbol(Symbol.iterator): ƒ]

Arguments(2) [10, 20, callee: ƒ, Symbol(Symbol.iterator): ƒ]

Arguments(5) [10, 20, 30, 40, 50, callee: ƒ, Symbol(Symbol.iterator): ƒ]

Arguments(8) [10, 20, 30, 40, 50, 60, 70, 80, callee: ƒ, Symbol(Symbol.iterator): ƒ]

가변함수 합 구하는 함수 만들기

// 1
var sum = function(){
    var sum = 0;
    for(var i = 0; i < arguments.length; i++){
        sum += arguments[i];
    }
    return sum;
}

// 2
var sum = function(){
    var sum = 0;
    Array.prototype.forEach.call(arguments, function(n){// this=arguments
        // console.log(n); // arguments의 파라미터들
        sum += n;
    });
    return sum;
}

console.log(sum(10));
console.log(sum(10, 20));
console.log(sum(10, 20, 30, 40, 50));
console.log(sum(10, 20, 30, 40, 50, 60, 70, 80));


- JavaScript anonymous parameter : 익명 파라미터

[1] 연습

var f = function(arg1, arg2, arg3){
    console.log(arg1); // == console.log(arguments[0]);
    console.log(arg2); // == console.log(arguments[1]);
    arg3();			   // == arguments[2]();
}

f(10, {
    name : '둘리',
    age : 10
}, function(){
    console.log('hello');
});

10

{name: “둘리”, age: 10}

hello

[2] 연습

b = new Array(10, 20, 30);
console.log(b); // (3) [10, 20, 30]

Array = function(){
    var a = [];
    for(var i = 0; i<arguments.length; i++){
        this.a[i] = arguments[i];
    }
    return a;
}

🧐 Javascript BOM(Browser Object Model) 정리

  • 자바스크립트가 브라우저와 소통하기 위한 모델이다.
  • 웹 브라우저 창을 관리할 목적으로 메소드와 속성으로 동작한다.
  • 웹 브라우저 창을 관리할 목적으로 제공되는 객체 모음을 대상으로 하는 모델이다.
  • BOM의 역할은 웹 브라우저의 버튼, URL 주소입력창, 타이틀 바 등 웹 브라우저 윈도우 및 웹 페이지의 일부분을 제어할 수 있게하는 윈도우 객체 모델이다.

[1] - Window 전역 객체

윈도우 객체 확인

var s = '';
for(var key in window){
    s += (key + ' : ' + window[key] + '\n')
}
console.log(s);


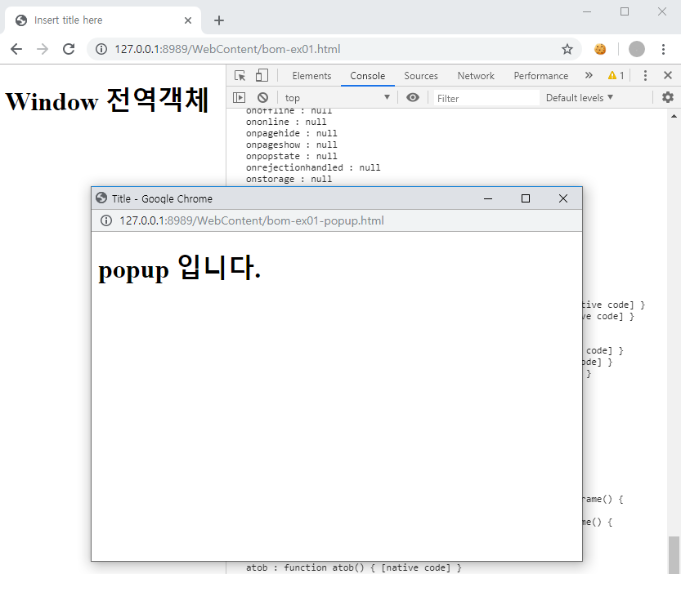
새로운 window 객체 생성 - 팝업창

// 새로운 window 객체 생성
setTimeout(function(){
    window.open('bom-ex01-popup.html', 'popup', 'width=600, height=400', true);
}, 2000);

bom-ex01-popup.html

<h1>popup 입니다.</h1>
views


popup 내용 바꾸기

setTimeout(function(){
    var popup= window.open('bom-ex01-popup.html', 'popup', 'width=600, height=400', true);
    popup.document.write('<h1>change popup text</h1>');
}, 2000);
views


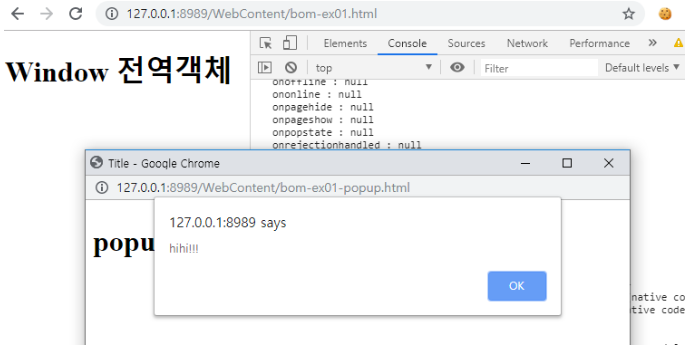
같은 domain의 alert창 띄워보기

setTimeout(function(){
    var popup= window.open('bom-ex01-popup.html', 'popup', 'width=600, height=400', true);
    
    setTimeout(function(){
        popup.pop();
    }, 1000);

}, 2000);

bom-ex01-popup.html

<head>
<script>
    var pop = function(){
        alert('hihi!!!');
    }
</script>
</head>
<body>
    <h1>popup 입니다.</h1>
</body>
views


자식 창의 스크립트도 실행 : moveTo

단, 보안상 cross-domain 문제 때문에 같은 domain에서만 가능하다.

setTimeout(function(){
    var popup= window.open('bom-ex01-popup.html', 'popup', 'width=600, height=400', true);
    
    popup.moveTo(0, 0);
    setTimeout(function(){
        popup.pop();
    }, 1000);

    setTimeout(function(){
        popup.moveTo(100, 100);
    }, 2000); // 2초뒤에 팝업창 위치 이동
    
}, 2000);

[2] - Screen 객체

window의 사이즈와 위치 조정도 가능하다. (잘 쓰지 않음)

// 팝업창
var child = window.open('','','width=300, height=300', true);

// 현재 윈도우 스크린
var width = screen.width;
var height = screen.height;

console.log(width + ' : ' + height);

// 팝업창을 현재 윈도우 스크린 크기만큼 늘림
child.moveTo(0, 0);
child.resizeTo(width, height);

setInterval(function(){
    // 0.5초마다 사이즈 줄이고 위치 가운데로
    child.resizeBy(-20, -20);
    child.moveBy(10,10);
}, 500);

[3] - location 객체 [주소창]

객체 확인해보기

var s = '';
for (var key in location){
    s += (key + ":" + location[key] + '\n')
}
console.log(s);

page refresh 방법

<!-- refresh 방법1 -->
<button onclick="location = location;">refresh1</button>

<!-- refresh 방법2 -->
<button onclick="location.href = location.href;">refresh2</button>

<!-- refresh 방법3 -->
<button onclick="location.assign('');">refresh3</button>

<!-- refresh 방법4 -->
<button onclick="location.replace(location);">refresh4</button>

<!-- refresh 방법5 -->
<button onclick="location.reload();">refresh5</button>

[4] - navigator 객체

객체 확인해보기

var s = '';
for (var key in navigator){
    s += (key + ":" + navigator[key] + '\n')
}
console.log(s);

브라우저 정보 확인

<script src='browser-detect.js'></script>
<script !src="">
	var s = '';
	for (var key in navigator){
		s += (key + ":" + navigator[key] + '\n')
	}
	// console.log(s);

	BrowserDetect.init();
	console.log(BrowserDetect.browser);
	console.log(BrowserDetect.version);
	console.log(BrowserDetect.OS);
</script>

Chrome

75

Windows


🧐 Javascript DOM(Document Object Model) 정리

용어 정리

1. 태그(Tag)
	- HTML 문서 안에서 텍스트나, 콘텐츠를 정의할 때 사용하는 마크업
2. 문서 객체(document object)
	- DOM(Document Object Model, Tree)이 구성된 다음 노드의 타입(HTMLElement)
	- JS에서 접근하고 조작하는 것
3. 노드(Node)
	- Dom Tree 각각의 요소

순서

<script>alert('step-0');</script>
</head>
<body>
    <h1>step-1</h1>
    <script>alert('step-2');</script>
    <h1>step-3</h1>
    <script>alert('step-4');</script>
</body>

순서가 보장되지 않음(자바스크립트 실행 속도가 더 빠름) - alert를 믿지말자!


DOM loading 완료 시점

window.onload = function () {
    // DOM loading 완료가 된 시점(body가 다 구성된 후)
    console.log(document.getElementById('header-1'));
}


[1] - 문서 객체 만들기 - 1

<head>
<script>
	window.onload = function(){
		var header = document.createElement('h1');
		var textNode = document.createTextNode('Hello DOM');
		header.append(textNode);

		setTimeout(function () {
			document.body.appendChild(header);
		}, 2000);
	}
</script>
</head>
<body>
	<h1>문서 객체 만들기 - 1</h1>
</body>
views


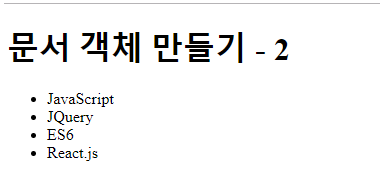
[2] - 문서 객체 만들기 - 2

<head>
<script>
	window.onload = function(){

		var html = "";
		html += "<ul>";
		html += "<li>JavaScript</li>";
		html += "<li>JQuery</li>";
		html += "<li>ES6</li>";
		html += "<li>React.js</li>";
		html += "</ul>";

		setTimeout(function () {
			document.body.innerHTML += html;
		}, 2000);
	}
</script>
</head>
<body>
	<h1>문서 객체 만들기 - 2</h1>
</body>
views


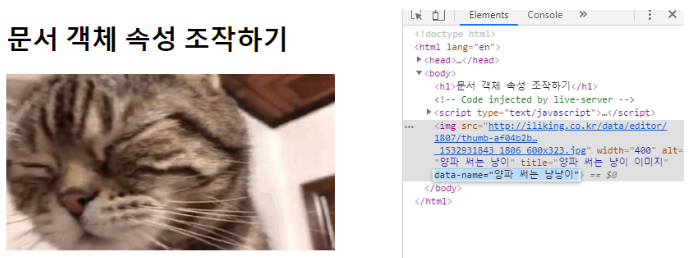
[3] - 문서 객체 속성 조작하기

표준 속성

표준 속성은 문서 객체로 설정이 가능하다.

<head>
<script>
	window.onload = function(){
		var img = document.createElement('img');
		setTimeout(function () {
			document.body.appendChild(img);

			img.src = 'http://iliking.co.kr/data/editor/1807/thumb-af04b2b5dd8d05d65f037749593ca639_1532931843_1806_600x323.jpg';
			img.width = 400;
			img.alt = '양파 써는 냥이';
			img.title = '양파 써는 냥이 이미지'

		}, 2000);
	}
</script>
</head>
<body>
	<h1>문서 객체 속성 조작하기</h1>
</body>
views


비표준 속성 .setAttribute()

비표준 속성까지 설정하기 위해서는 메소드를 사용한다.

<head>
<script>
	window.onload = function(){
		var img = document.createElement('img');
        
		setTimeout(function () {
			document.body.appendChild(img);
            img.setAttribute('src','http://iliking.co.kr/data/editor/1807/thumb-af04b2b5dd8d05d65f037749593ca639_1532931843_1806_600x323.jpg');
			img.setAttribute('width', 400);
			img.setAttribute('alt', '양파 써는 냥이');
			img.setAttribute('title', '양파 써는 냥이 이미지');
			img.setAttribute('data-name', '양파 써는 냥냥이');
		}, 2000);
	}
</script>
</head>
<body>
	<h1>문서 객체 속성 조작하기</h1>
</body>
views


[4] - 문서 객체 값 가져오기 (탐색)

1) 문서 객체 아이디로 가져오기

<script>
	window.onload = function(){
		var header1 = document.getElementById('header-1');
		var header2 = document.getElementById('header-2');

		setTimeout(function () {
			header1.innerText = 'by getElementById()';
			header2.innerText = 'by getElementById()';
		}, 1000);
	}
</script>
<body>
	<h1>문서 객체 가져오기 - 1</h1>
	<h1 id="header-1">Header</h1>
	<h1 id="header-2">Header</h1>
</body>


2) 문서 객체 태그 이름으로 가져오기

반드시 document 객체를 사용해서 DOM 전체에서 탐색할 필요는 없다.

document 객체 대신에 부모 문서 객체로 getElementsByTagName 메소드 호출이 가능하다.

<script>
	window.onload = function(){
		var headers = document.getElementsByTagName('h2');

		setTimeout(function () {
			headers[0].innerText = 'by getElementsByTagName';
			headers[1].innerText = 'by getElementsByTagName';
		}, 1000);
	}
</script>
<body>
	<h1>문서 객체 가져오기 - 2</h1>
	<h2>Header</h2>
	<h2>Header</h2>
</body>


3) 문서 객체 클래스로 가져오기

<script>
	window.onload = function(){
		var headers = document.getElementsByClassName('header');

		setTimeout(function () {
			headers[0].innerText = 'by getElementsByClassName';
			headers[1].innerText = 'by getElementsByClassName';
		}, 1000);
	}
</script>
<body>
	<h1>문서 객체 가져오기 - 3</h1>
	<h2 class="header">Header</h2>
	<h2 class="header">Header</h2>
</body>


4) 문서 객체 css 선택자(selector)로 가져오기 (html5부터 지원)

<script>
	window.onload = function(){
		var header1 = document.querySelector('#header-1'); // id
		var headers = document.querySelectorAll('.header'); // class

		setTimeout(function () {
			header1.innerText = 'by querySelector()';
			headers[1].innerText = 'by querySelectorAll()';
		}, 1000);
	}
</script>
<body>
	<h1>문서 객체 가져오기 - 3</h1>
	<h2 id='header-1' class='header'>Header</h2>
	<h2 id='header-2' class='header'>Header</h2>
</body>

3 Javascript 연산자 / 배열 / String / URL 공부

|

[1] in 연산자

var o = {
    name : '마이콜',
    age : 20,
    hasProperty:function(property){
        return property in this
    }
}
console.log(o.hasProperty('name'));
console.log(o.hasProperty('age'));
console.log(o.hasProperty('email'));

true

true

false


[2] 객체는 hasOwnProperty 속성을 기본으로 갖고있음

Object안에 prototype이 가리키는 객체가 있는데 그 객체들이 함수들을 갖고있어서 쓸 수 있음

var o = {
    name : '마이콜',
    age : 20,
    hasProperty:function(property){
        return property in this
    },
    __proto__ : {객체를 가리킴}
}

자기안에서 찾아보고 없으면 proto가 가리키고 있는 객체에서 찾아서 씀

in 연산자와 같은 역할

console.log(o.hasOwnProperty('name'));
console.log(o.hasOwnProperty('age'));
console.log(o.hasOwnProperty('email'));

true

true

false


[3] with()

잘 쓰지 않는 명령어

  • with 이후에 오는 구문을 위해 scope chain에 인자로 받는 object를 추가한다.

=> 속성들을 바로 접근 가능하도록 설정

var o = {
    name : '둘리',
    age : 10,
    info : function(){
        console.log(this.name + " : " + this.age) // this = 호출자
    },
    info2 : function(){
        with(this){
            console.log(name + " : " + age)
        }
    },
    info3 : function () {
        var str = '';
        for(var data in this){
            str += (data + " & ");
        }
        console.log(str.substring(0, str.length-1));
    }
}
o.info();
o.info2();
o.info3();

둘리 : 10

둘리 : 10

name & age & info & info2 & info3 &

보통 with보다는 아래와 같은 형식으로 변수로 저장해 with처럼 사용한다.

var s = document.getElementById("title").style; 
s.background = "black"; 
s.color = "white"; 
s.border = "1px solid yellow";


💥 javascript에서 변수를 쓸 때는 var를 붙이자

만약 위의 코드에서 변수에 var를 안붙이면 글로벌에서 사용할 수 있음

    info3 : function () {
        var str = '';
        for(data in this){ // data에 var 안붙이면
            str += (data + " & ");
        }
        console.log(str.substring(0, str.length-1));
    }

console.log(data); // info3 출력
// data에 var 붙이면 지역변수로 사용하기때문에 global에서 못씀 


배열 정의

[1] 생성자 함수

배열의 크기는 동적으로 변한다. (오류가 나지 않는다.)

new Array(size)에서 size를 지정해주는 것은 별다른 의미가 없지만,

고정 사이즈를 주면 성능이 향상한다.

배열 정의할 때, 크기 지정은 의미가 없다. 동적으로 늘어난다.

var a1 = new Array(10); // !10)은 의미가 없다
a[0] = 0;
a1[11] = 0;
a1[12] = 0;
console.log('Array a1 : ' + a1);
console.log('a1 length : ' + a1.length);

Array a1 : 0,,,,,,,,,,,0,0,,,,,,,,0

a1 length : 21

배열과 객체에 아래처럼 동일하게 값 넣을 수 있다.

// 배열
a = []
a["0"] = 0;
a["1"] = 1;
console.log(a);
a[0] = 10;
console.log(a);

// 객체
o = {}
o["0"] = 0;
o["1"] = 1;
console.log(o);
o[0] = 10;
console.log(o);

(2) [0, 1]

(2) [10, 1]

{0: 0, 1: 1}

{0: 10, 1: 1}


[2] literal

  • Array 내부 저장 타입은 정해져 있지 않다.
  • 중간에 비어져 있는 값은 오류가 나지 않고, undefined이다.
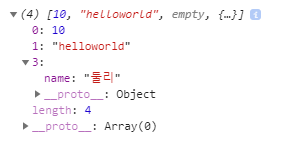
var a2 = [];
console.log('a2 length : ' + a2.length);

a2[0] = 10;
a2[1] = 'helloworld';
a2[3] = {
    name : '둘리'
}
console.log('Array a2 : ' + a2);
console.log('a2 length : ' + a2.length);
console.log('a2[2] : ' + a2[2]); // undefined : 오류는 안남!

a2 length : 0

Array a2 : 10,helloworld,,[object Object]

a2 length : 4

a2[2] : undefined

console.log(a2);
views


[3] 배열 초기화 & 순회

console.log('-------------초기화---------------')
var a3 = [1, 'abc', true];
console.log(a3);

var a4 = new Array(1, 'abc', true);
console.log(a4);

console.log('------------순회----------------')
for(var i=0; i < a4.length; i++){
    console.log(a4);
}

————-초기화—————

[1, “abc”, true]

[1, “abc”, true]

————순회—————-

(3) [1, “abc”, true]

(3) [1, “abc”, true]

[1, “abc”, true]


배열 함수

1) concat

var colors = ['black', 'white', 'yellow'];
var fruits= ['mango', 'banana', 'apple'];

var test = fruits.concat(colors);
console.log(test);

(6) [“mango”, “banana”, “apple”, “black”, “white”, “yellow”]


2) join

var str = fruits.join(', ');
console.log(str);

mango, banana, apple


3) pop(stack)

var color = colors.pop();
console.log(color);
console.log(colors);

yellow

(2) [“black”, “white”]


4) push(stack)

colors.push('red')
console.log(colors);

(3) [“black”, “white”, “red”]


5) reverse

console.log(fruits);
fruits.reverse();
console.log(fruits);

(3) [“mango”, “banana”, “apple”]

(3) [“apple”, “banana”, “mango”]


6) shift

var numbers = [4000, 8000, 3000, 5000, 1000];
console.log(numbers);
numbers.shift();
console.log(numbers);

(5) [4000, 8000, 3000, 5000, 1000]

(4) [8000, 3000, 5000, 1000]


7) slice

var numbers2 = numbers.slice(0, 2);
console.log(numbers)
console.log(numbers2)

(4) [8000, 3000, 5000, 1000] (2) [8000, 3000]


8) sort

numbers.sort();
console.log(numbers);

(4) [8000, 3000, 5000, 1000]

(4) [1000, 3000, 5000, 8000]


9) splice

console.log(fruits);
var fruits2 = fruits.splice(0/*index*/, 2/*count*/); // index부터 count개 삭제 후 삭제 값 리턴
console.log(fruits);
console.log(fruits2);

(3) [“apple”, “banana”, “mango”]

[“mango”]

(2) [“apple”, “banana”]


prototype으로 배열 확장

// 배열 확장(remove, insert)
Array.prototype.insert = function(index, value){
    this.splice(index, 0, value);
}

Array.prototype.remove = function(index){
    this.splice(index, 1);
}

// 배열을 리스트 처럼 사용하기
// insert(index, val), remove(index)
a = [1, 2, 4];
a.insert(2, 3);
console.log(a); // (4) [1, 2, 3, 4]

a.remove(3);
console.log(a); // (3) [1, 2, 3]

a.insert(2, ['a', 'b', 'c']) // 2번지에 ['a', 'b', 'c'] 레퍼런스 값이 저장됨
console.log(a); // (4) [1, 2, Array(3), 3] 
console.log(a[2]); // (3) ["a", "b", "c"]

[1, 2, Array(3), 3] 이렇게 말고, [1, 2, [“a”, “b”, “c”], 3] 이렇게 넣고 싶으면

[1] var _this = this; 사용

Array.prototype.insert = function(index, value){
    if(value instanceof Array){
        var _this = this;
        value.forEach(function(element){ // callback function
            // this.splice(index++, 0, element); // 이 코드는 오류 = 현재 this 는 [object Window]임
            _this.splice(index++, 0, element);
        });
    } else{
        this.splice(index, 0, value);
    }
}

[2] bind 사용

bind : 함수와 객체를 서로 묶는 것

.bind(obj) 로 함수를 호출하면 인자로 넘겨눈 객체가 this가 된다.

Array.prototype.insert = function(index, value){
    if(value instanceof Array){
        value.forEach(function(element){ 
            this.splice(index++, 0, element);
        }.bind(this/*if의 this = 배열객체*/));
    } else{
        this.splice(index, 0, value);
    }
}


연관 배열(Associted Array) 사용 예

// 연관 배열(Associted Array)
var employee = {
    name : '홍길동',
    title : '과장',
    info : function(){
        console.log(this.name + " : " + this.title);
    }
}

console.log(employee.name); 	//홍길동
console.log(employee['name']);  //홍길동

// 사용 예 1
// 메소드 이름(문자열)로 호출할 때
var s = 'info';
console.log(s); //info
employee[s](); //홍길동 : 과장 // 스트링 변수로 함수 호출

// 사용 예 2
// map(Java), dict(Python)
var map = {}
map['one'] = 1;     // 호출할 때 : map.one = 1
map['two'] = 2;     // 호출할 때 : map.two = 2
map['three'] = 3;   // 호출할 때 : map.three = 3

console.log(map['three']);  // 3
console.log(map)			// {one: 1, two: 2, three: 3}

String

// 배열처럼 접근 가능
var str = 'hello world';
for(var i = 0; i < str.length; i++){
    console.log(str[i]);
}

// 문자열 합치기(+)
var str1 = "Hello";
var str2 = "World";
var str3 = str1 + " " +str2;
console.log(str3);

var number = 5;
var str4 = "5" + number;
console.log(str4, " : ", typeof(str4))

var str5 = "boolean : " + true;
console.log(str5);

h

e

l

l

o

w

o

r

l

d

Hello World

55 : string

boolean : true

String 객체 함수

// 객체 함수
var str6 = "string1 string2 string3";
console.log(str6.length); // 23

var index = str6.indexOf('string4');
console.log(index); // -1 : 없는 값이면 -1반환
index = str6.indexOf('string2');
console.log(index); // 8

var str7 = str6.substr(index) // index ~ 부터
console.log(str7); // string2 string3

var str8 = str6.substr(index, 7/*count*/) // 8부터 7개
console.log(str8); // string2

var str9 = str6.substring(index, 10/*last index -1*/)
console.log(str9); // st

var a = str6.split(' ')
console.log(a); // (3) ["string1", "string2", "string3"]

var str10 = 'abcdefg';
a = str10.split(':');
console.log(a); //["abcdefg"]

url

redirection

자바스크립트를 이용해서 특정 URL로 접속했을 때 다른 URL로 이동

// client side redirection
location.href = url;

escape

escape 사용금지

  • 아스키문자에 해당하지 않는 문자들은 모두 유니코드 형식으로 변환
var url = 'http://localhost:8080/mysite3?n=이"정"은
var url2 = escape(url); // Deprecated
console.log(url2);

http://127.0.0.1:8989/WebContent/http%3A//localhost%3A8080/mysite3%3Fn%3D%uC774%22%uC815%22%uC740%26e%3Dleeap1004@gmail.com


encodeURI

전체 URL -> parameter 부분만 encoding

  • URL 주소표시를 나타내는 앞자리 특수문자는 인코딩하지 않음
var url = 'http://localhost:8080/mysite3?n=이"정"은
var url3 = encodeURI(url);
console.log(url3);

http://localhost:8080/mysite3?n=%EC%9D%B4%22%EC%A0%95%22%EC%9D%80&e=leeap1004@gmail.com


encodingURIComponent

전체 URL -> 전체 URL encoding

  • 주소를 나타내는 특수문자도 인코딩
var url = 'http://localhost:8080/mysite3?n=이"정"은
var url4 = encodeURIComponent(url);
console.log(url4);

http://127.0.0.1:8989/WebContent/http%3A%2F%2Flocalhost%3A8080%2Fmysite3%3Fn%3D%EC%9D%B4%22%EC%A0%95%22%EC%9D%80%26e%3Dleeap1004%40gmail.com


encodingURIComponent 사용 예

var url = 'http://localhost:8080/mysite3';
var queryString = '?' + 
		 'n=' + encodeURIComponent('이"정"은') + 
		 '&e=' + encodeURIComponent('leeap1004@gmail.com');
var url5 = url + queryString
console.log(url5);

http://localhost:8080/mysite3?%3Fn%3D%25EC%259D%25B4%2522%25EC%25A0%2595%2522%25EC%259D%2580%26e%3Dleeap1004%2540gmail.com


사용예 2

var toQueryString = function(o){
	var qs = [];
	for(key in o){
		qs.push(key + "=" + encodeURIComponent(o[key]));
	}
	return "?" + qs.join('&');
}

var url = 'http://localhost:8080/mysite3';
var url6 = url + toQueryString({
	name: "이정은",
	e: "leeap1004@gmail.com"
}); 
console.log(url6);
setTimeout(function(){
	// client side redirection
	// location.href = url6;
}, 5000);


10 리눅스에 nodejs설치 및 간단한 서버 실행

|

linux에 node 설치

설치 순서

nodejs를 설치하기 전에 2가지를 설치해주어야 한다.

1, node 버전 관리 : nvm 설치

둘 중 하나의 방법으로 설치

cURL 설치:

curl -o- https://raw.githubusercontent.com/nvm-sh/nvm/v0.34.0/install.sh | bash

혹은 Wget:

wget -qO- https://raw.githubusercontent.com/nvm-sh/nvm/v0.34.0/install.sh | bash


2, 패키지 관리 : npm 설치

# rpm -Uvh http://dl.fedoraproject.org/pub/epel/6/x86_64/epel-release-6-8.noarch.rpm

# yum -y install npm


3, node.js 설치

# yum install nodejs

[root@localhost ~]# node --version
v0.10.48

node --version으로 설치 완료를 확인할 수 있다.


Test로 js 파일 만들어서 실행해보기

디렉토리에서 다음과 같이 nodejs를 실행해 볼 수 있다.

[root@localhost ~]# cd dowork/
[root@localhost dowork]# ls
lx01Java  network  pgsql-sample-data  python-projects  sysprog  vitest
[root@localhost dowork]# mkdir js
[root@localhost dowork]# cd js/
[root@localhost js]# vi hello.js
 > `console.log("Hello!!!");` 
[root@localhost js]# 
[root@localhost js]# node hello.js 
Hello!!!


간단한 node 웹 서버 실행해보기

위치 : /root/dowork/js js파일을 넣을 디렉토리를 만든뒤 아래의 코드를 넣어준다.

# vi httpd.js

const http = require('http');
 
const hostname = '0.0.0.0';
const port = '9999';
 
// http모듈의 createServer 함수를 호출로 서버 생성
// req: 웹 요청 매개변수, res: 웹 응답 매개변수
httpd = http.createServer(function (req, res) {
    // writeHead: 응답 헤더를 작성
    // 200: 응답 성공, text/html: html문서
    res.writeHead(200, {'Content-Type': 'text/html'});
    // end: 응답 본문을 작성
    res.end('Hello World111');   
});

// listen: 매개변수로 포트와 호스트를 지정
httpd.listen(port, hostname, function(){    
    console.log('server start');
});

# node httpd.js

views