함수를 정의하면 다른 곳에 생성되며, 프로토 타입 객체는 다른 객체의 원형이 되는 객체이다.
모든 객체는 프로토타입 객체에 접근할 수 있으며 프로토타입 객체도 동적으로 런타임동안 멤버를 추가할 수 있다.
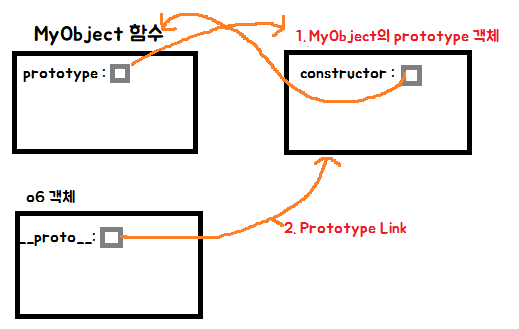
자바스크립트에서는 만들어진 객체 안에 __proto__(비표준) 속성이 자신을 만들어낸 원형을 의미하는 프로토타입 객체를 참조하는 숨겨진 링크가 있다.
프로토 타입 역할 2가지
1. Prototype Object : 함수의 멤버인 prototype 속성은 -> prototype객체를 지정하는 역할

2. Protoype Link : 객체안의 __proto__(비표준) 속성은 자신을 만들어낸 원형인 프로토 타입 객체를 참조하는 숨겨진 링크로써 프로토타입
prototype 속성은 함수만 가지고 있지만(ex. MyObject.prototype),
__proto__ 속성은 모든 객체가 빠짐없이 가지고 있다.(조상 함수의 prototype Object를 가리킨다.)
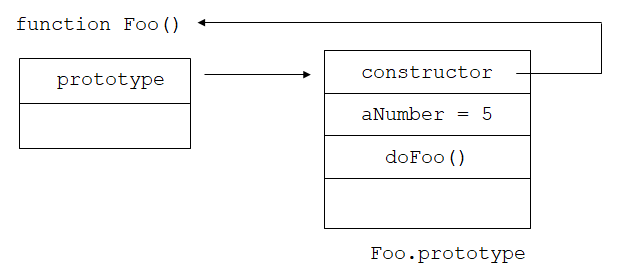
javascript에서 함수를 정의하면 함수 멤버로 prototype 속성이 있다.
이 속성은 함수이름의 prototype 객체를 참조하고, prototype 객체의 멤버인 constructor 속성은 함수 내부를 참조하는 내부 구조를 가진다.
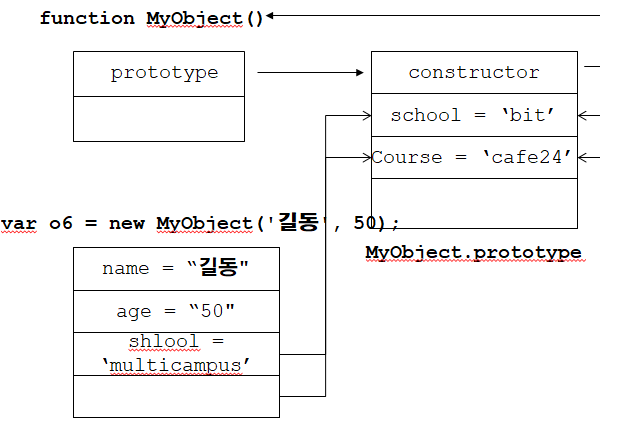
1) prototype 기반 상속
MyObject를 통해 생성되는 모든 객체는 MyObject함수의 prototype 속성이 참조하는 프로토 타입 객체를 참조한다.
// MyObject 함수 생성varMyObject=function(name,age){console.log('생성자 함수');this.name=name;this.age=age;}// MyObject의 prototype 속성 추가MyObject.prototype.school='bit';MyObject.prototype.course='cafe24';// 이렇게 하면 MyObject의 prototype의 constructor에 들어감// MyObject로 객체 생성varo6=newMyObject('길동',50);console.log(o6);console.log(o6.school)// 객체에서 속성을 찾고 속성이 없으면, 이 객체의 생성자의 객체를 찾음, 없으면 undefineconsole.log(o6.course)// 해당 객체의 속성에 넣음o6.school='multicampus'console.log(o6.school)
다음 속성과 함수(메서드)를  가지고 있는 Class 개념을  function과 프로토타입을 사용하여 구현해 보세요.
1) 생성자  함수 Rectangle (클래스 Rectangle)
2) LeftTop 좌표 x1, y1
3) RightBottom 좌표 x2, y2
4) backgroundColor  ( #fff )
5) show 함수 : 화면에 사각형을 표시
<!DOCTYPE html><html><head><metacharset="UTF-8"><title>Insert title here</title><script src='rect.js'type="text/javascript"></script><script>window.onload=function(){varrects=[newRect(100,100,200,300,"RGB(0,0,255)"),newRect(250,250,400,400,"#f00")]varindex=0;varintervalId=setInterval(function(){if(index>=rects.length){clearInterval(intervalId);return;}rects[index++].show();},1000);}</script></head><body></body></html>

 콩정의 개발 정리 블로그